Plumbing leaks can be a bit scary for homeowners, and sometimes a challenge to locate and remediate. A recent client of ours called us regarding a leak in the master bath shower. We always take a sort of combined “detective / scientist” approach to diagnosing such problems, seeking to systematically eliminate possible root causes in order to zero in on the true root of the problem, and the fix it.
Water leaks in a shower can be caused by leaks in the supply lines, (in the copper pipes and fittings, in the shower valve assembly itself or in the drop-eared flange that the shower head gooseneck tube screws into); or from leaks in the floor drain assembly; or from a crack in the shower pan (sometimes hairline cracks that only open up when a heavy person steps into the shower and applies downward pressure on the pan); or from cracks in the tiles or grout between tiles; or in areas where caulking between tile and pan are allowing water to leak through and get below the pan. Since a leak can come from any one (or more) of these sources, we need to zero in on the true source of the leak…otherwise we’d just be guessing and trying to fix things one piece at a time….which obviously would be a more time- and capital-intensive approach than systematically narrowing it down to the correct root cause and then remediating just that single issue.
In this case, we first used a bucket to catch water from the shower head while running the shower for several minutes (both hot and cold) and capturing all water which was then poured down the toilet. We then checked for evidence of leaks in the unfinished basement directly below, and also pulled the escutcheon from the shower valve and used a borescope (snake camera) to look at the shower valve and also all around in the wall cavity behind the valve to verify that there were no leaks whatsoever occurring in the “wet wall” — the wall where all of the supply lines, drop-earned flange and shower valve are located. Finding no visible evidence of water leaks (current or past) inside the wet wall, and no evidence of water in the basement as a result of this initial water-run test, we then shifted to the next test — that being of the drain assembly. We started by testing these two areas first because our observation of the shower pan itself, as well as the tile, grout and caulking seems to indicate that none of these visible areas were compromised. They still might have been, but our experience suggested it was more likely an issue with the supply or drain lines.
So, we then poured several buckets of cold and then hot water straight down the drain without getting the rest of the pan (or shower walls) wet, attempting to test the water tightness of the drain assembly. We also stepped all around the shower pan during this test, trying to flex it where it attaches to the drain, in hopes that we would cause an intermittent leak to actually occur for us while we were pouring gallons of water down the drain. This test actually did indeed prove to be what we believed to be the source of the leak. We disassembled the drain system and found that there wasn’t a proper seal where two portions of the drain came together. We remediated this missing seal, and also repaired a small area of tile around the entrance dam that appeared to have been stressed due to water having leaked under the pan and behind the tile, causing the substrate to expand, popping the tiles. We then allowed everything to fully cure, and then came back and tested everything again, being rewarded with no further evidence of any leaks! The client was thrilled.
The next chapter of this story is perhaps the most interesting, and instructional as well. About a month later the client called and said they were having leaks again…. they were seeing a few drips (not much water, but still a few drips on the concrete floor in the basement were indeed troubling to them). So, a few days later we went back out, looked at the pipes, and ran through the entire series of tests to determine where the leak was occurring this time. We found no evidence of any further leaks….and could not get it to leak whatsoever, using all of the approaches we have in our arsenal. I then called the client and he had me speak with the tenant who reported the most recent “leak”. I wanted to probe a bit deeper with her as to when the “leak” actually occurred, and how it manifested itself.
She said that the leak had vanished, so all was now fixed. Hmmm….I thought: it might be intermittent, but no true leak just “self heals”. I explained that If there was truly a leak, then the root cause would still need to be identified and remediated.
“But let’s talk about the leak a bit more…when it happened, when it stopped, etc.”
She said that the leak was visible as a drip of water on the floor, and on the bottom of an “L” fitting on one of the supply lines in the basement, where the lines turn upward and head up into the wet wall where the connect to the shower valve. And this happened a weak earlier than when we arrived to test things, but was now not leaking any more.
“Ah ha! I know what’s happening”, I said. “The supply line that was dripping…it was the one on the right — the one closest to the front-side of the house….right?”
“Uuhh, Yes, how did you know?”
“I think I know what’s going on”, I said. “When you saw the drips on the floor…what was the temperature like in the house? Did it feel hot inside? ”
“Yes, that was when we had that horribly hot period for about a week, and it was also very muggy…both inside and outside…we don’t have A/C, and it was very warm all throughout the house.”
“That’s what I thought. And now it’s much cooler, and dry, like it usually is here in Colorado…right?”
“Yes – but how does that factor into the plumbing?” she asked.
“It doesn’t change the plumbing, but I think that’s why you saw the drips coming from the supply line. The line that’s closest to the front of the house is the cold water line…and when you ran a lot of cold water through it, the water vapor in the air inside the house condensed on the outside of the cold water line just like condensation on the outside of a tumbler when you put an ice-cold drink in it — and eventually the condensate dripped down and off the end of the L where it turned at 90-degrees. That’s why there was water on the floor below, and why you felt the wetness on that pipe.
“And now?”, she asked.
“Now the weather is less humid, and the house is cooler inside and you’re not keeping the windows open…right? And there’s less humidity coming in. So, less water vapor in the ambient air, so less to be condensing on the cold water line,” I said. “We already tested and inspected the supply lines in the wet wall, and there’s no leaks whatsoever in those lines, so I’m confident that the water you’re seeing isn’t coming from a leak in the plumbing. So, it must be simply a bit of condensation on the cold water supply line!”
“if you insulate the supply lines in the unfinished basement, you will not only save a little energy by keeping the hot water line from releasing some of its heat into the basement air, but you’ll also keep the cold water line from getting condensate on it, and causing false alarms, like this one, where it did seem like your plumbing was having a leak,” I explained. Mystery solved….no more leaks!
The moral of the story is: “What looks like a leak isn’t always a leak.”
– Jim Bartlett, Co-Founder & CEO
 Thank you to everyone that voted for A Master’s Hands, LLC in Colorado Community Media’s Best of the Best Contest! We are overwhelmed and truly honored by the far-reaching support that we received from our clients across the Denver Metro area, and just received word that we have been named the winner of Best of the Best in Littleton for the Home Repairs & Remodeling category. Thank you and God Bless!
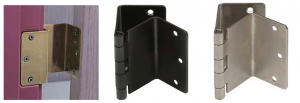 adding about 2 inches of additional clearance for wheelchairs and walkers. (NOTE: Almost another inch of extra clearance can be obtained by removing the lower portions of the door stop trim on both sides of the opening, allowing for wheelchair clearance while still leaving stops in place above chair level to keep the door from swinging too far inward.)


 The Ethics In Business Award is given each year to one for-profit company, and one non-profit organization. A Master’s Hands was one of 9 finalists, and won the award for the former category.
  annual Chairman’s Inaugural Luncheon on Friday, January 18th. In this photo co-founders Michele and Jim Bartlett are receiving the award from West Chamber CEO Brian Willms.
 This is done via a long stem on the hose bib that extended through the wall back into the heated portion of the home. So, when you turn off the water it shuts off back in side the home. Then, the remaining water in the pipe that extends beyond that shutoff point drains down and out, leaving the portion of the hose bib that’s “exposed” to weather and cold temperatures completely empty. And an empty pipe can’t be frozen and burst open by extremely cold temperatures because there’s nothing inside it to expand and crack the pipe. Makes sense, right? Here’s the rub: if you leave a hose connected to the spigot, that can prevent the extra water from draining out of the hose bib after it’s shut off. Result? When temperatures drop again, that water is trapped inside the tube that should be empty, the water freezes and expands, and crack! — the pipe pops open.